Getting Started
Available Components
- Single Line
- Email with Verification
- Phone Number
- Multi-line Text
- Date and Time Input
- Image Captcha
- File Uploads
- Star Rating
- Agreement
- Single Choice
- Multiple Choices
- Country Selection
- Cloudflare Captcha
Configuration
Integrations
Development
How to upload attachments to Airtable using API
Airtable supports columns of type Attachment which can contain arbitrary file uploads. These may include an image file (JPG or PNG or GIF) or a zip file or just about anything at all. While Airtable provides ways to upload a file using their GUI, the information on how to do that via an external program or script is not clear. This article attempts to address this issue.
We use an example Airtable base Expense Trackin to demonstrate the code. This sample base is provided by Airtable as an example. This base includes a single table called Receipt Log. It contains two Attachment fields called Item Photo and Receipt Photo along with a bunch of other fields. We will now create a record with uploads for these attachment fields.
Authentication
To be able to read or create records in an Airtable, you need to authenticate yourself with the accounnt. Airtable supports two types of authentication:
- Personal access token is used to grant access to your account to another person or entity.
- Oauth authentication is used when you need to authorize another application to perform actions on your behalf.
For our example, we will use a Personal access token to make API calls. Making API calls using Oauth authentication is substantially the same.
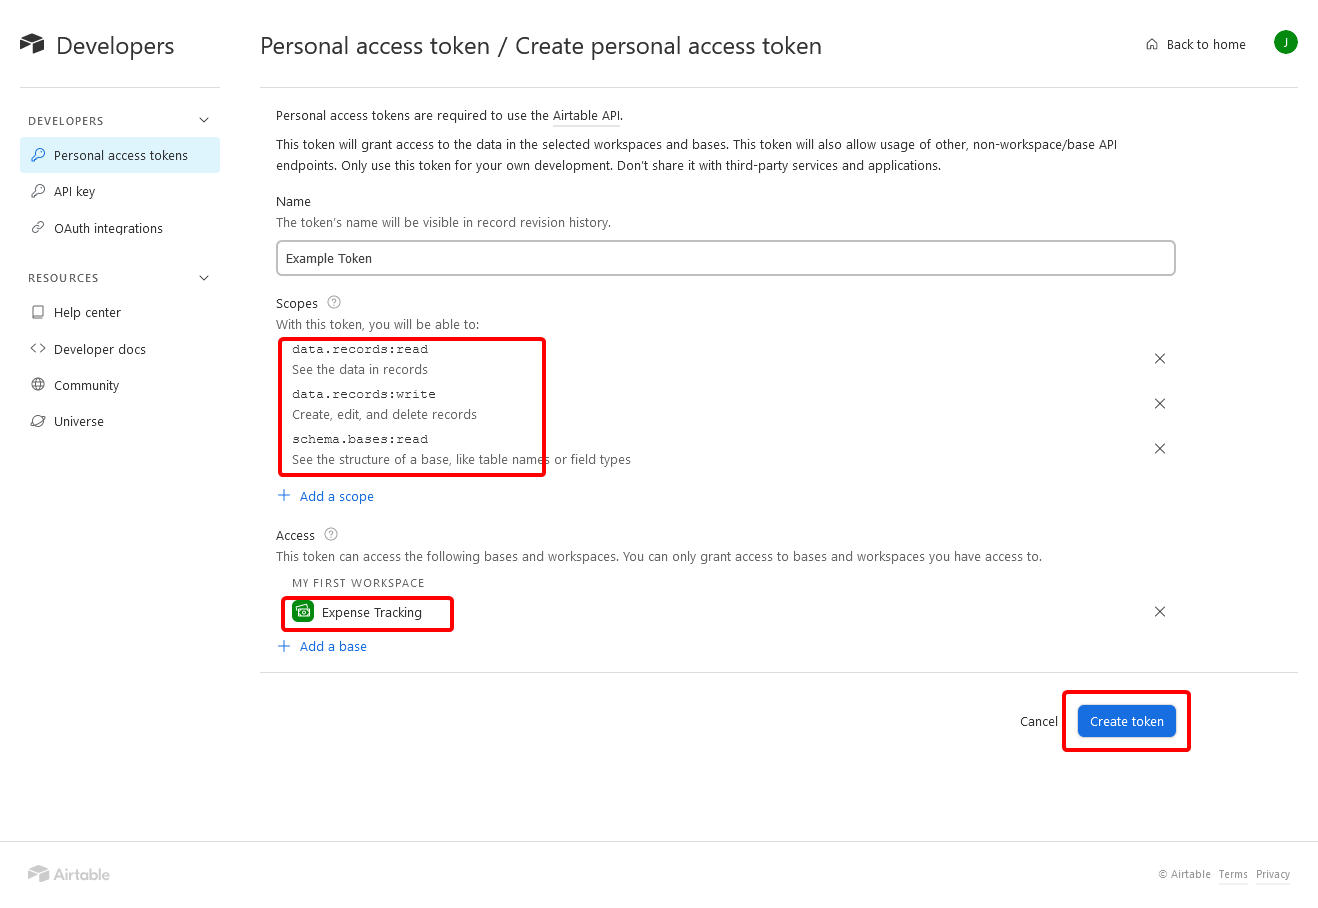
- Navigate to the personal access tokens
page and click on Create token

- On the Create token page, enter a name for the token
for your identification. Next choose the following scopes
which allow read and write access to the records:
- data.records:read allows reading records from your airtable.
- data.records:write allows your script to write one or more records.
- schema.bases:read allows you to read the structure of your table.
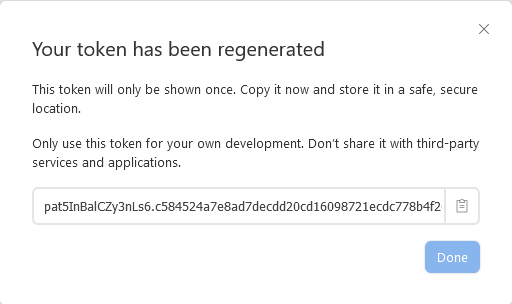
-
A box will appear with the token for your program to use. Copy the token and store it in a safe place. We will use this later to invoke Airtable API. Do not expose the token to the public as we have done here. This is just an example and we have revoked the token shown so it won't work.
Our first API call
Now that we have our API token, let us make our first API call to Airtable. The call we are making lists the available bases. Here is what it looks like.
import requests, json

API_TOKEN = '-- your api token here --'

resp = requests.get('https://api.airtable.com/v0/meta/bases',
                    headers = {
                        'Authorization': f'Bearer {API_TOKEN}'
                    })
resp.raise_for_status()
print(resp.json())
Response received to the call shows the bases available with the API key.
{
  "bases": [
    {
      "id": "appLNi67byiXQBQs1",
      "name": "Expense Tracking",
      "permissionLevel": "create"
    }
  ]
}
And here is how to list the tables available in the base shown above.
baseId = bases["bases"][0]["id"]
url = f'https://api.airtable.com/v0/meta/bases/{baseId}/tables'
resp = requests.get(url, headers={
    'Authorization': f'Bearer {API_TOKEN}'
})
resp.raise_for_status()
print(json.dumps(resp.json(), indent=2))
The response to the table listing API call is shown below (truncated):
{                                                                                                                                                                 [106/46990]
  "tables": [
    {
      "id": "tblp43jU9lsRooZaX",
      "name": "Receipt Log",
      "primaryFieldId": "fldgmWjEk2HratckK",
      "fields": [
        {
          "type": "singleLineText",
          "id": "fldgmWjEk2HratckK",
          "name": "Short Description"
        },
        {
          "type": "multipleAttachments",
          "options": {
            "isReversed": false
          },
          "id": "fldy7SE7OVbxyl8Ba",
          "name": "Item Photo"
        },
...
      ]
    }
  ]
}
Adding a row to the table
Let us now look into how to create a new record (also known as a row) in the table Receipt Log. The definition of the table is shown below (truncated to show only important details).
{
  "name": "Receipt Log",
  "fields": [
    {
      "type": "singleLineText",
      "name": "Short Description"
    },
    {
      "type": "multipleAttachments",
      "name": "Item Photo"
    },
    {
      "type": "multipleAttachments",
      "name": "Receipt Photo"
    },
    {
      "type": "dateTime",
      "name": "Date & Time"
    },
    {
      "type": "currency",
      "name": "Total"
    },
    {
      "type": "singleSelect",
      "name": "Category"
    },
    {
      "type": "singleSelect",
      "name": "Who Paid?"
    },
    {
      "type": "multilineText",
      "name": "Notes"
    }
  ],
}
We see that the fields Item Photo and Receipt Photo are of type multipleAttachments. We will update these fields along with the field Short Description which is of type singleLineText.
Airtable requires that one or more publicly accessible URLs be specified for a field of type multipleAttachments. Airtable downloads the contents of the URLs into this field when the field is added. So we need to upload the files to another service (such as Imgur for image files) where the URL is publicly accessible, and then provide these URLs to Airtable when we create the record. A bit of a roundabout compared to directly uploading files from the hard disk, but that is what Airtable requires.
And here are the links to a sample Item photo and Receipt Photo that we will use.

Item Photo

Receipt Photo
We will use a value of Burrito meal at Burrito bar for the field Short Description. The data required to be POSTed to create the record looks like this:
{
  "fields": {
    "Short Description": "Burrito meal at Burrito bar",
    "Item Photo": [
      {
        "url": "https://i.imgur.com/oXA8Q6C.jpeg",
        "filename": "bold-flavors-big-taste.jpg"
      }
    ],
    "Receipt Photo": [
      {
        "url": "https://i.imgur.com/zls0l7r.jpeg",
        "filename": "CustomLogoReceipt4.jpg"
      }
    ]
  }
}
Note that each multipleAttachments field needs an array of a objects containing, at the minimum, a url field. In addition, we have also specified the filename field.
The call to create a record now looks like this:
baseId = bases["bases"][0]["id"]
tableId = tables['tables'][0]['id']
url = f'https://api.airtable.com/v0/{baseId}/{tableId}'
resp = requests.post(url,headers={
    'Authorization': f'Bearer {API_TOKEN}'
}, json=fields)
resp.raise_for_status()
print(json.dumps(resp.json(), indent=2))
The response from Airtable to this call looks like below. Note that Airtable has fetched and stored the data from the URLs we specified and the url field in the response reflects that (URLs have been truncated).
{
  "id": "recOzyTlU7yQeHxCp",
  "createdTime": "2024-05-28T15:12:33.000Z",
  "fields": {
    "Short Description": "Burrito meal at Burrito bar",
    "Receipt Photo": [
      {
        "id": "attt9n9yl0G2Zlmuq",
        "width": 819,
        "height": 1361,
        "url": "https://v5.airtableusercontent.com/v3/...",
        "filename": "CustomLogoReceipt4.jpg",
        "size": 111722,
        "type": "image/jpeg",
        "thumbnails": {
          "small": {
            "url": "https://v5.airtableusercontent.com/v3/...",
            "width": 22,
            "height": 36
          },
          "large": {
            "url": "https://v5.airtableusercontent.com/v3/...",
            "width": 512,
            "height": 851
          },
          "full": {
            "url": "https://v5.airtableusercontent.com/v3/...",
            "width": 819,
            "height": 1361
          }
        }
      }
    ],
    "Item Photo": [
      {
        "id": "atthgdjNtw7oP7eK3",
        "width": 600,
        "height": 400,
        "url": "https://v5.airtableusercontent.com/v3/...",
        "filename": "bold-flavors-big-taste.jpg",
        "size": 90931,
        "type": "image/jpeg",
        "thumbnails": {
          "small": {
            "url": "https://v5.airtableusercontent.com/v3/...",
            "width": 54,
            "height": 36
          },
          "large": {
            "url": "https://v5.airtableusercontent.com/v3/...",
            "width": 600,
            "height": 400
          },
          "full": {
            "url": "https://v5.airtableusercontent.com/v3/...",
            "width": 600,
            "height": 400
          }
        }
      }
    ]
  }
}
Conclusion
This article showed how to create a record in an Airbase table, and how to upload a file into a field of type multipleAttachments. While the process is fairly straightforward, documentaion and examples on how to upload a file to an Airbase field is lacking. This article addressed this issue.
For further help, check out these pages too.
Getting Started
Available Components
- Single Line
- Email with Verification
- Phone Number
- Multi-line Text
- Date and Time Input
- Image Captcha
- File Uploads
- Star Rating
- Agreement
- Single Choice
- Multiple Choices
- Country Selection
- Cloudflare Captcha